
Meta Quest 2/Oculus Quest 2 headsets come with their own bunch of amazing content from Meta on Oculus Store. However, if you want to explore some new virtual reality games with the popular VR headset, you can connect it to a VR-ready computer using the cable i.e. Oculus Link or wirelessly via Air Link.
Why connect PC and Meta Quest 2 via Air Link?
Connecting Meta Quest 2 with a PC allows you to play the vast range of fascinating VR games that aren’t yet available on Meta Store. The PC version of Oculus Quest 2 games also comes with better graphics.
However, launched back in 2019, Oculus Link to connect your Quest 2 with the PC using a cable has limits your movements as you enjoy your favorite VR games. Thus, the wireless Air Link option is just the right bid to solve your problem.
Steps to connect Oculus Quest 2 to PC wirelessly:
- Install the Meta Quest application on your computer.
- Log in using your Facebook/Meta/Oculus account (In case you have multiple accounts, use the one you have logged into the headset.
- Press the Oculus button on the touch controller. It will bring up the toolbar in the virtual reality space.
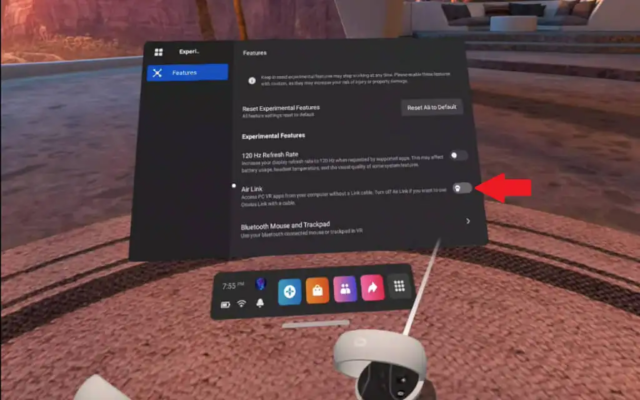
- Select Quick Settings shortcut >> Settings>> System>> Select Quest Link.

- Turn on the Quest Link toggle.
- Select Launch Quest Link in Quest settings >> Select and turn on the “Use Air Link” toggle

- Pair your PC>>Verify code>>Click Continue

Note: If pair option isn’t available or can’t find your computer, see you are logged in into the Meta Quest app and it is currently running on your computer and Oculus Quest 2 is selected in the device section.
Your Meta VR headset, Quest 2 is finally connected to your PC wirelessly via Air Link. You can now comfortably play your favorite VR games, watch movies and more. Besides, you now have access to the connected computer desktop, allowing you to control it in virtual reality.
We hope you found this article helpful. For more such latest updates, stay tuned to TechThirsty. Also Read: Best Action Games for Meta Quest 2 (formerly Oculus Quest 2) in 2023